Your toaster has one job, and it does it a few hundred times a year without complaint. That’s exactly why most of us ignore it until the morning it burns everything on one side, trips the breaker, or fills the kitchen with that smell you can’t unsmell.
I’ve cooked on cheap $20 units, mid-range four-slicers, and hand-built classics that outlive their owners. The failure pattern is remarkably consistent. Toasters almost never die instantly.
They fade. Elements dim, timing drifts, latches weaken, cords stiffen. If you know what to look for, the signs show up months, sometimes years, before the toaster becomes genuinely dangerous.
This guide covers all of it: every warning sign, what causes it, whether it’s worth fixing, when it crosses into fire-hazard territory, and how the math on repair versus replacement actually shakes out. Let’s get into it.

Image source: Pexels / Вадим Биць (Pexels License)
Quick Answer: When Should You Replace a Toaster?
You should replace your toaster when any of the following happens, and stop using it immediately in the cases marked dangerous:
| Sign | Severity | What to do |
|---|---|---|
| Frayed, cracked, or scorched power cord | Dangerous | Replace the toaster now. Unplug it first. |
| Burning plastic or electrical smell | Dangerous | Stop using it. Replace it. |
| Sparks, buzzing, or a hot plug | Dangerous | Unplug and replace. |
| Breaker or GFCI trips when the toaster runs | Serious | Test the outlet first; if the outlet is fine, replace the toaster. |
| An entire heating element never glows | Moderate | Toasting will keep degrading. Replacement is usually smarter than repair. |
| One slot consistently under-toasts | Moderate | Check element condition. If one side stays dark, the element is failing. |
| Toasting time keeps creeping upward | Moderate | Elements and thermostats age. Plan for a replacement. |
| Lever won’t latch or toast pops too early | Minor–Moderate | Mechanical wear. Repair rarely makes economic sense. |
| Crack in the housing or rust inside the cavity | Moderate–Serious | Heat shields and insulation matter. Replace it. |
| Crumbs smoking during use | Serious | Clean first. If it recurs on a clean toaster, replace it. |
Everything below explains these signs in detail, plus the ones that fool people, the problems that look like a dying toaster but are really just dirty trays, wrong bread settings, or a weak outlet.
How Long Should a Toaster Last?
A well-made pop-up toaster that gets daily use typically lasts 6 to 8 years. A cheaply built one often starts misbehaving within 3 to 5. Premium or repairable models can run 15 years or more, and some classics have been toasting since the 1950s.
There’s nothing mystical about this. A toaster is a resistor wire (usually nichrome, a nickel-chromium alloy), a switch, a timing mechanism, and a sheet-metal shell. The elements expand and contract every cycle.
The latch springs every morning. Eventually, something gives.
| Toaster type | Typical lifespan | Common failure point |
|---|---|---|
| Basic 2-slice pop-up | 3–6 years | Heating elements, latch spring |
| Quality 4-slice pop-up | 6–10 years | Timing circuit, element on one side |
| Long-slot toaster | 5–8 years | Uneven element wear across the long element |
| Smart/toaster with digital controls | 4–7 years | Circuit board fails before the elements do |
| Repairable premium models | 15+ years | Nothing, if you service them |
Two things swing these numbers more than brand name ever will: how often you toast and how much moisture and crumb debris the machine eats. A family running it twice a day puts on far more cycles than a single person who toasts on weekends. And a toaster that lives next to a steaming kettle ages faster than one kept dry, moisture corrodes element terminals long before the elements themselves burn out.
Worth knowing: the first electric toasters appeared in the early 1900s, and the pop-up design has been around since the 1920s. The core engineering is old and reliable. What changed over the decades is the build quality at the budget end, thinner elements, cheaper latches, and control boards that fail before the heating side does.
Signs Your Toaster’s Heating Elements Are Failing
The elements are the heart of the machine, and they tell you everything if you watch them work. A healthy element glows a fairly even dull red-to-orange along its full length within a few seconds of the lever dropping. No gaps.
No dead stretches. No dramatic bright spots.
Here’s how that changes as the element ages, and every one of these is a sign you can see with your own eyes:
One side never glows. If an entire element stays dark while its neighbor glows normally, the wire has broken or a terminal connection has corroded through. That slot is now running at roughly half heat. No setting will fix this.
The element glows in patches. Healthy nichrome glows evenly. Failing wire glows brighter in some spots and dimmer in others, because the wire’s resistance has changed where it’s stretched, oxidized, or partially melted. Patchy glow means patchy toast, permanently.
Coils are sagging, warping, or touching. Look at the element runs on the inside walls of each slot. Straight, evenly spaced coils are good. A coil that has sagged into a clump, or two sections leaning toward each other, is running hotter at the contact point.
That concentrated heat scorches bread and, in bad cases, scorches the housing behind it.
Visible rust or white, chalky oxidation. Light surface oxidation on old elements is cosmetic. Heavy rust flaking off onto your toast, or elements that look brittle and crumbly, means the wire is near the end of its life.
The element glows, then dims, then flickers. Flicker usually means a loose or corroded connection that’s arcing slightly. That’s not just a toasting problem, arcing is an electrical problem, and it sits in the same category as a bad cord. Replace the unit.
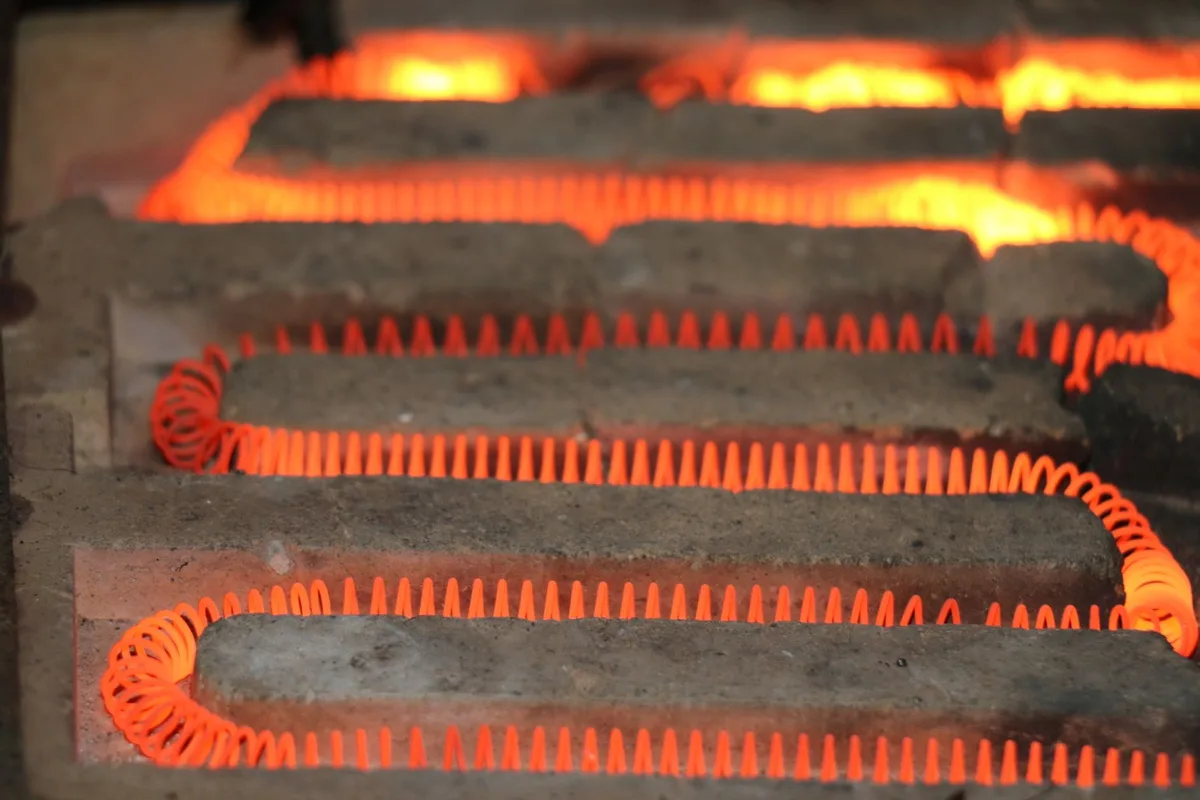
Image source: Pexels / Zulfugar Karimov (Pexels License)
Can you test an element with a multimeter? Yes, with the toaster unplugged, a continuity test across the element terminals will tell you if the wire is intact. But here’s my honest take: don’t bother unless you enjoy the diagnosis for its own sake.
Most modern toasters are riveted shut, the elements are often crimped in place rather than plug-connected, and a replacement unit costs about the same as an hour of your time. Diagnose by eye. Decide with your wallet.
Uneven Toasting and Browning: When It’s the Toaster and When It’s You
Uneven toast is the most common complaint I hear, and it’s also the most misdiagnosed. Before you condemn the machine, rule out the boring causes:
- Bread position. Slices pressed against one side of the slot sit closer to that element and brown faster on that face. Center the slice.
- Bagel mode left on. Bagel mode powers one side only, on purpose. If your toast is pale on top and dark on the bottom, check that button first.
- Bread differences. Fresh bread holds more moisture than day-old, and frozen bread needs the defrost cycle. Very even sandwich loaves toast evenly; hand-cut sourdough doesn’t.
- Crowded slots. Two thick slices jammed into one slot block radiant heat. Give them their own slots.
If none of that explains it, then yes, you have a toaster problem, and the pattern tells you which one:
Same side, every slice, every slot. A whole element running weak or a warped reflector behind it. Consistency is the tell. Mechanical error is random; element failure is repeatable.
One slot dramatically weaker than the other. That slot’s element is failing or its terminals are corroded. It will get worse, not better.
Dark streaks and pale stripes on the same slice. Patchy element glow, as described above. The heat map on your bread is a direct photo of your element’s health.
Scorching where the bread touches the cage, everywhere else pale. The element wire is sagging into the guard. This one is a genuine hazard, not just a nuisance, a sagging wire pressed against metal is how localized overheat and smoke start.
One more legitimate toaster-side cause: the browning thermostat. Traditional pop-up toasters time the cycle with a bimetallic strip that bends as it heats. As that strip fatigues over the years, the calibration drifts, usually toward lighter toast at the same dial setting, because it trips early.
You compensate by turning the dial up, then up again. That drift is normal aging, and it’s your early warning that the machine is in its final years.
Toasting Time Keeps Creeping Longer
This sign gets overlooked because it’s gradual. Nobody notices their toaster taking 20 seconds longer. They notice their mornings getting slightly more annoying, and they blame the bread.
Here’s what’s actually happening. As nichrome elements age, they oxidize and their effective heating output drops. The toaster still works, so you slide the dial darker.
Six months later, dial to maximum and it’s still pale. Meanwhile the machine draws the same electricity and dumps a growing share of it as wasted heat instead of useful radiant heat.
Run this simple test: put identical slices of bread from the same loaf in both slots, set the dial to a mid setting, and time the cycle with your phone’s stopwatch. Then repeat a week later. If times are climbing, or one slot routinely runs 30% longer than the other for the same result, the elements or the timing mechanism are going.
There’s a secondary benefit to catching this early: a toaster that takes dramatically longer to do the same job is running hotter, longer, every cycle. Its internal wiring, its latch mechanism, and its cord are all soaking in more cumulative heat. Slow decline in performance is fast-forwarding the wear on everything else.
Lever, Latch, and Control Problems
The mechanical side of a toaster fails on its own schedule, and it fails loudly. These are the specific faults to watch:
Toast pops up before it’s browned. On bimetal-strip toasters, the strip weakens with age and trips early. On electronic models, a worn sensor or tired circuit board does the same. If your dial maxed out years ago and you’re still getting pale toast, the machine is timing out on you.
The lever won’t stay down at all. The latch, either a spring catch or a small electromagnet, depending on the design, has failed. If the machine won’t hold the bread down, it’s done in a practical sense.
The lever sticks down, or toast won’t pop up. This is the dangerous version. A stuck carriage means the elements keep running with no timer to stop them. If your toast ever gets stuck and you have to force the lever up, don’t just clear it and move on.
If it happens twice, the mechanism is failing, and an unattended toaster that won’t shut off is a fire risk, full stop.
Buttons, dials, and lights misbehave. On modern toasters, the cancel button sticking, indicator LEDs dying, or the bagel/defrost settings doing nothing are symptoms of a failing control board. On budget machines, that board is rarely worth replacing.
The crumb tray won’t stay seated. A tray that slides out on its own dumps crumbs onto the counter, and worse, leaves a gap that lets crumbs fall into the electronics below. Usually fixable by bending the tray’s retaining tabs slightly, but if the housing around it is warped from heat, that’s a write-off.
None of these are subtle. If you’re popping the lever twice every morning or holding it down with a finger, your toaster has already told you it’s retiring.
Burning Smells, Odd Odors, and Smoke
Smell is the sense that catches toaster trouble earliest, so it pays to know which odors are normal:
Normal, the first two or three uses: a faint hot-oil or “new appliance” smell. Manufacturers use light machine oils in assembly, and the first cycles burn them off. Run the toaster empty at a medium setting a couple of times, ventilate the kitchen, and it goes away.
Normal, after storage: a musty or dusty smell on first use. Dust settles on the elements. One empty run on a medium setting clears it.
If the smell persists after that empty run, clean the crumb tray and interior before you panic.
Not normal, ever: a burning plastic smell. That’s insulation melting, on wiring, on a connector, or on the housing itself. Unplug it the moment you smell it.
There’s no version of this that gets better with use.
Not normal, ever: a sharp, acrid electrical odor, like hot metal with an edge to it. That’s overheating wiring or an arcing connection.
Smoke during an empty run on a clean machine is the loudest warning of all. Crumbs smoking is a cleaning issue (more on that below). A clean, empty toaster smoking means something inside is burning, and you’ve just watched it happen.
A practical habit that catches problems early: run your toaster empty on a medium setting once a month and stand there while it cycles. You’ll smell trouble before you see it, and you’ll spot element problems in the glow.
Electrical Red Flags You Should Never Ignore
Everything in this section shares one rule: these are cord-and-plug problems, and they mean replacement. You do not rewire a toaster. You do not tape a cord. Consumer toasters are not designed to be opened and serviced by users, and the price of a new one is a rounding error compared to an electrical fire.
Watch for:
- Frayed, cracked, or chewed insulation on the cord. Any exposed copper is an immediate disqualification.
- A plug that’s discolored, warped, or hot to the touch after a cycle. Heat at the plug means resistance at the connection, and resistance means heat is being generated where it shouldn’t be.
- Bent or loose prongs. A poor connection in the outlet generates heat at the outlet, which is worse than the toaster problem.
- Scorch marks on the cord, the plug, or the outlet faceplate.
- A buzzing or crackling sound from the toaster while it runs. That’s arcing.
- The breaker or GFCI trips whenever the toaster runs. Test the toaster in another outlet. If it trips there too, the toaster has an internal fault, typically moisture ingress or failing insulation. Replace it.
- A tingle or shock from the housing. Never touch a toaster that shocks you again. Unplug it and retire it.
One more electrical point that catches people out: check for recalls before you keep using an older unit. Toaster manufacturers issue recalls for fire and shock hazards more often than most people realize, and plenty of recalled units stay in kitchens for years afterward. The U.S. Consumer Product Safety Commission maintains a searchable recall database, take two minutes, find your model number, and check it.
If your toaster is on the list, the recall usually gets you a refund or replacement anyway.
When a Toaster Becomes a Fire Hazard
Everything above was about performance. This section is about the morning you don’t want to have.
A toaster’s elements run at roughly 1,200°F at the surface, that’s how they brown bread, by radiating infrared heat at close range. Now consider what else lives inside a toaster: crumbs. Carbohydrate dust, often greasy, sitting inches from those elements, accumulating cycle after cycle.
That’s the core fire equation, and it’s why the humble crumb tray is the single most important maintenance item on the machine. A crumb layer that ignites will flame up inside the slots, and a toaster on the counter next to a paper towel roll, a wooden cabinet overhang, or a curtain is no longer just a toaster problem.

Image source: Pexels / Andrey Matveev (Pexels License)
Context helps here. Cooking equipment is consistently the leading cause of home fires and home fire injuries in the United States, according to the U.S. Fire Administration.
Toasters are a small slice of that total, but the slice that happens is almost always the same story: crumbs ignited, a jammed mechanism that never shut off, or a frayed cord left energized.
The specific fire-hazard scenarios to take seriously:
Crumb ignition. Crumbs visibly smoking during or after a cycle is the early stage. Clean immediately. If a clean toaster still smokes, it’s done.
The stuck-latch runaway. A toaster whose elements keep running after the cycle should have ended, or whose lever can’t be made to pop, will keep heating until something burns or a thermal fuse (on models that have one) blows. Never leave the kitchen while a toaster with a sticking lever is running, and replace it soon.
Retrieving jammed toast with a fork. Please don’t. Metal into an energized, element-hot cavity risks both a shock and a short. Unplug the toaster, let it cool fully, then use wooden or plastic tongs.
Even unplugged-but-recently-used elements can have residual charge in some circuit-board-equipped models, the cool-down wait costs you nothing.
Leaving it plugged in. A toaster’s standby draw is tiny, but a plugged-in toaster with a damaged cord, an internal fault, or a stuck switch can energize at any time. Fire-safety guidance is blunt on this: unplug small heating appliances when you’re done with them. It costs one second.
The recalled unit nobody checked. Covered above, and worth repeating: a recall exists because that model injured people or burned houses. Check your model.
Physical Damage: Cracks, Dents, and Rust
The housing isn’t cosmetic. It’s a heat shield, an insulation barrier, and the thing standing between 1,200°F elements and your countertop.
Cracks in the body. Common on older Bakelite and plastic housings, usually around the lever or near the slot openings. A crack near the elements lets heat and crumbs into places they shouldn’t go, and it weakens the structure that holds live parts away from your hand. Replace it.
A dent in the side or top. Minor dents are cosmetic. But a dent that has deformed the metal near the element cavity, or that makes the housing bulge when hot, means internal clearances have changed. Heat where it isn’t designed to be is how counter scorching happens.
Rust inside the slot cavity. Small surface spots on the element guards are common and mostly cosmetic. Flaking rust that drops onto your food, or rust spreading across the interior floor of the cavity where crumbs sit, is a different story. Moisture got in somewhere, and moisture plus electrical contacts is the short-circuit combination from the electrical section above.
Any history of liquid inside. Someone dumped a drink into it, or it got hosed off, or it “fell in the sink.” Even if it seems to work afterward, internal corrosion and residue set up delayed failures, tripping breakers, arcing terminals, and smells that show up months later. Water-damaged heating appliances don’t recover; they hide the damage.
Repair or Replace? The Honest Math
Here’s the uncomfortable truth about toaster repair: for the vast majority of machines sold today, it isn’t economically sensible, and often it isn’t physically possible. Budget and mid-range toasters are assembled with rivets, crimped connections, and sometimes ultrasonic welds. There is no “element replacement part” to order for most of them.
Independent appliance repair shops, when you can find one that’ll take a $35 toaster, charge more in an hour than a replacement costs.
But there are exceptions, and they’re worth knowing:
| Scenario | Typical cost | Verdict |
|---|---|---|
| New basic 2-slice toaster | $20–$45 | Replace. Repairing anything in this class never pays. |
| New quality 4-slice | $50–$120 | Replace unless under warranty. |
| Repair shop diagnosis + labor | $40–$80+ | Never worth it on a budget machine. |
| DIY element swap on a repairable premium brand | $15–$40 in parts | Worth it — these brands are designed for it. |
| Vintage toaster restoration | $50–$150+ | A hobby decision, not an economic one. Worth it if you love the machine. |
| Warranty repair (within 1–3 years of purchase) | Free | Always check the warranty before you spend anything. |
The repairable-premium exception deserves a mention because it’s the anti-throwaway option. Brands like Dualit build their classic toasters specifically to be serviced: elements that slot in and out, parts that are sold individually, machines rated to last decades. If you toast daily and you’re tired of the replacement cycle, buying the repairable machine once is genuinely cheaper over 15 years than buying three or four budget units.
The decision rule I use:
- Anything electrical, cord, plug, arcing, shocks, breaker trips, replace, no exceptions.
- Under warranty? Claim it first.
- Mechanical fault on a budget toaster? Replace. The repair quote will exceed the machine’s value.
- Mechanical or element fault on a repairable premium model? Repair. That’s what it was built for.
- Emotional attachment to a vintage unit? Find a specialist. Just budget honestly for it.
One environmental note, because it comes up: replacing a $30 appliance is not the planet-wrecking act that replacing a refrigerator is. The greener move isn’t agonizing over a failing $30 toaster, it’s buying one that lasts longer next time and recycling the dead one properly (covered below).
What to Look for in a Replacement Toaster
If you’re shopping, a few features directly prevent the problems in this article:
- A removable crumb tray that’s genuinely removable, ideally one that slides out or drops out from the front without turning the toaster over or unplugging it. You’ll actually clean a convenient tray. You’ll never clean an inconvenient one.
- Wide, deep slots. They stop bread from jamming and reduce the leaning-against-the-element problem.
- A high-lift lever. Small feature, big quality-of-life gain for retrieving short items like crumpets without tongs.
- Recognized safety certification, a UL, ETL, or CSA mark on the base. That mark means the machine passed independent testing for fire and shock hazards.
- Removable, replaceable elements if you’re buying premium. It’s the difference between a 6-year machine and a 20-year machine.
- A longer warranty. One year is the industry floor. Three years signals the manufacturer expects the machine to survive them.
- Modest electronics. Every extra circuit board is another thing that can fail before the heating side wears out. A good mechanical toaster with a solid dial outlives a clever one.
How to Make Your Next Toaster Last for Years
Most of what kills toasters early is preventable with three minutes of care a week. Here’s the routine I’d follow:
Every week (with daily use): empty and rinse the crumb tray. Let it dry fully before it goes back. This one habit removes the top fire risk and stops crumb grease from cooking onto the interior.
Every month: hold the toaster upside down over the sink (unplugged and cool) and gently shake. Stray crumbs above the tray fall out. Run it empty on medium once and watch the elements, you’re checking for dead patches and flicker.
Every few months: wipe the exterior, including the lever and dial crevices where grease collects. Check the cord along its full length for wear, especially where it exits the housing, that’s the flex point that fails first.
Always:
- Unplug after use. It’s the single best fire-prevention habit for any heating appliance.
- Never immerse the toaster in water or run it under a tap. Interior moisture is a slow-motion killer of electrical parts.
- No metal utensils inside the slots. Wooden or silicone tongs only.
- Don’t let bread hang over the slot edges, and never toast anything drippy or frosted-facing-down, melted sugar on an element burns and corrodes it fast.
- Keep it dry and a little away from the sink and the kettle. Steam corrodes element terminals.
- Don’t run it with foil or wrappers inside, and don’t use it to dry out non-bread items unless the manual says it’s fine.
| Maintenance task | Frequency | Why it matters |
|---|---|---|
| Empty crumb tray | Weekly | Fire prevention |
| Upside-down shake-out | Monthly | Removes debris above the tray |
| Empty test run + element check | Monthly | Catches element failure early |
| Cord and plug inspection | Quarterly | Catches the most dangerous failure mode |
| Full exterior wipe-down | Quarterly | Grease buildup burns |
How to Retire an Old Toaster the Right Way
Don’t bin it, and don’t put it in the curbside recycling bin either, small appliances jam sorting machinery and usually get landfilled anyway.
If it still works: donate it. Charity shops, community fridges, shelters, and buy-nothing groups take working small appliances. Wipe it down, clean the tray, and include a note on any quirks.
If it’s dead: take it to an e-waste drop-off. Most electronics retailers run free recycling bins for small appliances, and most municipalities have household hazardous waste or e-waste collection days. The metal body, wiring, and elements are all recoverable material.
If the cord is damaged: cut it off before donating or recycling anything that still looks usable, so nobody plugs in a hazard. For a unit headed to e-waste, leave everything intact, the recycler handles it.
Toaster Replacement FAQ
How often should you replace your toaster?
There’s no fixed schedule, replace it when the signs appear, not on a calendar. With daily use, expect a budget toaster to last 3 to 6 years, a quality one 6 to 10, and a repairable premium model 15 or more. If yours still toasts evenly, pops on time, and shows no electrical wear, keep using it.
Is it safe to use a toaster with one broken heating element?
It’s not recommended. Beyond the lopsided toast, a dead element usually means a broken wire or corroded terminal, and the fault that killed it can progress to arcing. If one element is gone, the machine is at the end of its service life.
Why does my toaster smell like burning plastic?
Burning plastic means insulation, a connector, or the housing itself is overheating. Unplug it immediately and replace it. The only “plastic-ish” smell that’s normal is the faint new-appliance odor in the first two or three uses, which fades quickly.
Can a toaster catch fire when it’s not in use?
It’s rare, but it happens, usually through a damaged cord, an internal fault, or a stuck switch on a unit that was left plugged in. That’s why standard fire-safety guidance says to unplug small heating appliances after use, and why recalled units should never stay in service.
Why does my toaster keep tripping the breaker or GFCI?
First, test it in another outlet, the problem may be the circuit, not the toaster. If it trips everywhere, the toaster has an internal fault: moisture inside, failing insulation, or a damaged cord. That’s a replacement, not a repair.
Is it worth repairing a toaster?
For most modern toasters, no. Repairs cost more than replacements because budget machines aren’t built to be opened. The exceptions are premium repairable brands with sellable parts and any machine still under warranty, check the warranty before you spend a cent.
How do I test whether my toaster’s heating elements are failing?
Watch the glow. With the toaster empty, all elements should light an even red-orange within seconds. Dark sections, patchy brightness, sagging coils, or flicker all indicate failing elements.
Compare both slots with identical bread on the same setting, a consistently weaker slot confirms it.
Does a toaster use electricity when it’s plugged in but off?
Only a trivial standby amount, if any. The real reason to unplug isn’t the bill, it’s eliminating any chance that a cord fault or stuck switch energizes the machine unattended.
Can I replace a toaster heating element myself?
Only on models designed for it, where elements are sold as spare parts and slot in without disassembling the housing. On most budget and mid-range toasters, elements are riveted or crimped in place and no spare parts exist. Don’t open a sealed toaster, replumbing a mains-powered heating appliance with improvised parts is how fires start.
Why does my toast come out darker on one side?
Check the boring causes first: slice not centered, bagel mode on, or an unusually moist loaf. If the same side is dark on every slice in both slots, the reflector or element on that side is compromised, that’s a genuine toaster fault.
Is it OK to leave bread in the toaster overnight?
It’s not ideal. Bread sitting in the slots attracts pests and drops crumbs into the machine, and someone flipping the lever in the morning on an unattended appliance defeats the point of unplugging it. Clear it out and unplug.
My toaster works fine but the outside gets very hot. Is that normal?
Warm is normal, the housing is part of the heat path. Hot enough that you can’t hold your hand on it, or hot enough to discolor or scorch the counter beneath, is not. That points to a failing heat shield or internal clearance problem, and it’s a replacement.
The Bottom Line
A toaster tells you it’s dying long before it fails. Watch the glow of the elements, listen for the pop to drift, smell for anything sharp or plasticky, and glance at the cord every few months. Unplug it between uses, empty the tray weekly, and check for recalls once a year.
And when the signs stack up, dead element, drifting timer, tired latch, replace it without guilt. A toaster is one of the cheapest appliances in the kitchen and one of the few you touch every single morning. Keeping a failing one running costs more than a new one in every sense that matters.